Scriptor Tab

1. Introduction

In the Scriptor tab of StudyCrafter, you can use graphical programming to assign different functionalities to assets in the current scene (see also “Layout tab” in Onboarding), organize game progression, and collect experimental data. There are 11 different types of pre-defined nodes for you to choose from, including Comment, Group, Dialogue, Action, Player Choice, Branch, Set Variable, Sound, End Scene, Event, Make Function, and Call Function (see also “Nodes” in Onboarding). After inserting a node, you can easily adjust various parameters within the node to customize your game and connect different nodes to make the game operate according to your idea.

2. Interfaces

Figure 1. The interface of Scriptor tab

As shown in Figure 1, the interface consist of 3 main parts:

  • (1) Node display: it shows all nodes you create for the current scene in detail.
  • (2-3) Node list: it displays all nodes in a list you create for the current scene.
    • By using (3), you can open or close this tab
  • (4) Scene indicator: it displays the name of the currently edited scene. You can also use this to switch between scenes.
  • (5-6) Variables: it displays all variables you created for the game (see also “Variables” in Onboarding).
    •  By using (6), you can open or close this tab.

2.1 Node diplay

The node display shows all nodes you create for the current scene. As shown in Figure 2, the node display consists of 3 parts:

  • (1) Node display: a canvas that displays all nodes you create for the current scene in detail.
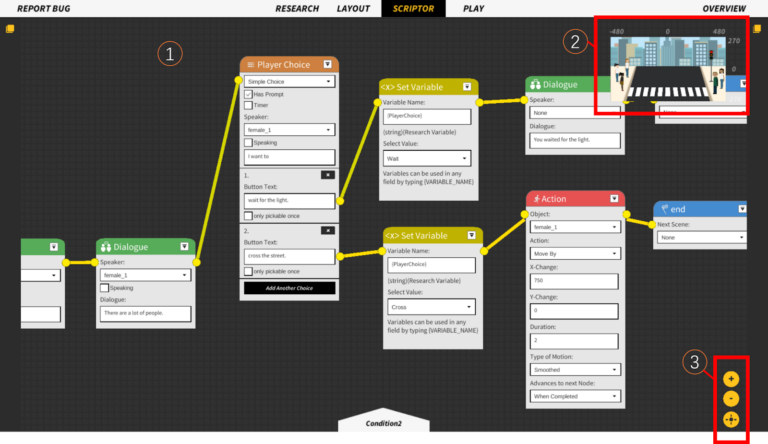
  • (2) Mini map: a mini map with scales of the current scene to indicate location of all objects in the current scene.
  • (3) Zoom handles: a handle that allows you to zoom in and out the node display.
    • : Click to zoom in.
    • : Click to zoom out.
    • : Click to change the viewpoint to the center of the canvas.

There are several operations you can perform within this interface:

  • Select existing nodes: To select a single node, you can use either the left or right mouse button to click on the node you want to select. A red border will appear to indicate that the node has been selected. To select multiple nodes, you can hold shift while selecting the nodes. You can also hold the shift and left mouse button to draw a rectangle and select all nodes within it.
  • Adjust a node: After nodes have been selected, you can adjust the selected nodes.
    • Move the nodes: You can move the selected nodes by holding the left or right mouse button and dragging them.
    • Copy and paste the nodes: You can use ctrl (or command) + C and ctrl (or command) + V to copy and paste the nodes you selected.
    • Delete the nodes: You can delete the selected nodes by using delete or backspace.
    • Change the name of the node: As shown in Figure 3, by double clicking the name of a node, you can change the name of that node.
Figure 2. The node display.
Figure 3. Changing the name of a node.
Figure 4. Linking two nodes.
Figure 5. Creating a new node.
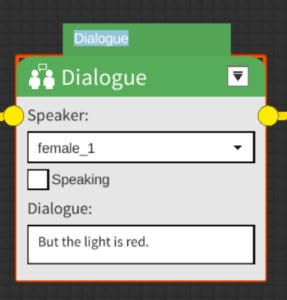
    • Change the parameters of the node: You can change the parameters in the nodes (See also “Nodes” in Onboarding).  
    • Show and hide the information of the node: You can click on / to show and hide the information of the node.
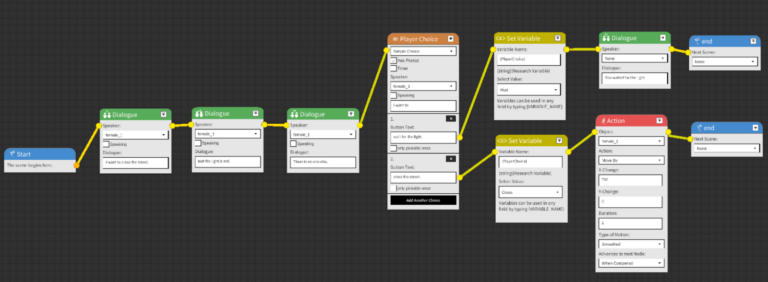
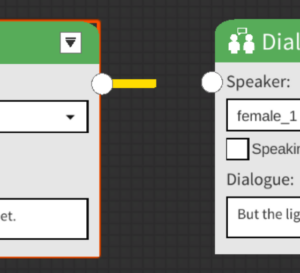
    • Link and unlink nodes: As shown in Figure 4, to link two nodes, you have to left-click on the white dots of the starting node and hold the left mouse button to drag the yellow line to the ending node. After the nodes are linked, the white dot will turn yellow. To unlink the nodes, you have to right click on the yellow line between them.
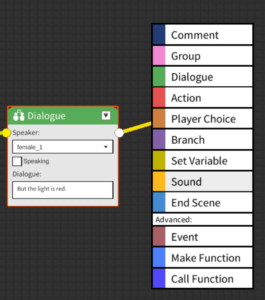
  • Create a new node: There are two ways to create a new node. First, you can left-click on the white dot and hold the left mouse button while dragging the yellow line to any location without nodes. Alternatively, you can right-click on any location without nodes to create a new node. As shown in Figure 5, a menu will then appear, allowing you to choose from 11 pre-defined nodes. For detailed information of different nodes, please see “Nodes” in Onboarding.
  • Adjust viewpoint: You can adjust your viewpoint by left-clicking on any location without nodes and holding the left mouse button while dragging the entire canvas. You can zoom in and out by scrolling the mouse wheel. You can also zoom in and out by using the zoom handles.

    2.2 Node list

    Figure 6. Node list.
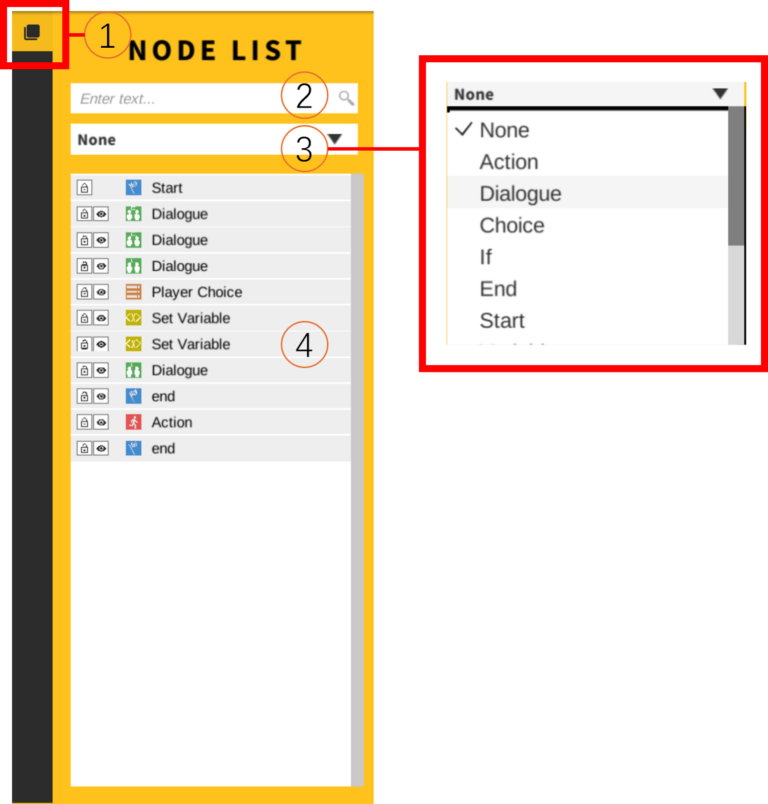
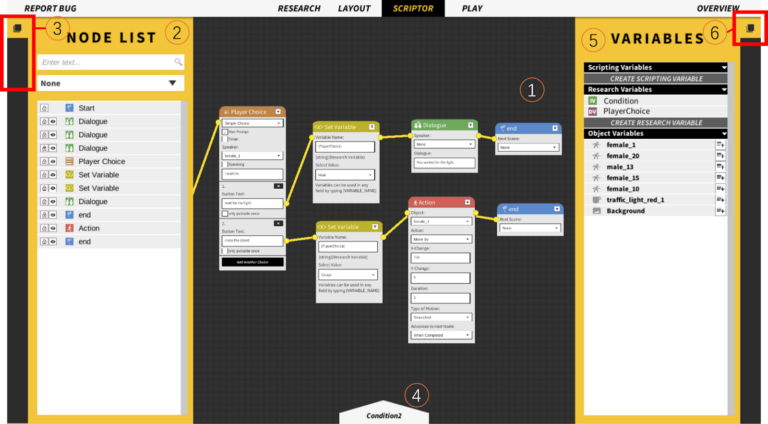
    As shown in Figure 6, the node list consists of 4 parts:
    • (1) Tab indicator: you can click on the icon to open or close the node list tab.
    • (2) Search bar: you can search the nodes in the current scene by the nodes name or any parameters in the nodes. The search results will be displayed in (4).
    • (3) Filter: you can filter the nodes by the type of the nodes. The filtered results will be displayed in (4).
    • (4) Node list: all nodes in the scene are displayed here as a list. For each node, you can apply the following operations by clicking the corresponding icon: 
      • : click to select the node. If it is black, the node is selected. This has the same effect as clicking on the nodes in the canvas. You can also select multiple nodes by holding shift while selecting.
      • /: lock or unlock the node. The locked nodes cannot be selected.
      • /: show or hide the detailed information of a node.

    2.3 Scene Indicator

    Figure 7. Scene Indicator.

    If you mouseover the scene indicator introduced in Interfaces, as shown in Figure 7, a bar that allows you to switch between scenes will appear. you can then click on the scene to switch.

    2.4 Variables

    Figure 8. Variables.

    As shown in Figure 8, the variable tab consists of 4 parts:

    • (1) Tab indicator: you can click on the icon to open or close the variable tab.
    • (2) Scripting variable list: display all scripting variables you create. You can also create new scripting variables by clicking on the “CREATE SCRIPTING VARIABLE”. For more information about scripting variables, see also “Scripting Variables” in Onboarding.
      • To adjust the existing scripting variables, you have to double click on them.
    • (3) Research variable list: display all research variables you create. Clicking on the “CREATE RESEARCH VARIABLES” will navigate you to the Research Tab to create research variables. For more information about creating and using research variables, see also “Research Variables” in Onboarding.
    • (4) Object variable list: display all objects in the current scene and their object variables. For more information about object variables, see also “Object Variables” in Onboarding.

    3. Programming in StudyCrafter

    Figure 9. Programming in StudyCrafter.

    Normally, Studycrafter will execute all your nodes in sequence. As shown in Figure 9, in each scene, it starts from the start node and ends with the end scene. You need to consider which events in your game scene will occur in sequence (assuming you are the player) and choose the corresponding nodes to insert into your program and connect them until the scene ends. Here are some tips to make your game more interesting:

    • Use action nodes and sound nodes to add appropriate animations and sound effects to the characters in your scene. (see “Nodes”)
    • Use scripting variables to control the game based on the player’s performance. (see “Scripting Variables”)
    • Use branch nodes or player choice nodes to branch your game based on different player actions. (see “Nodes”)
    • Use event nodes to create experiences that are nonlinear or outside the narrative. (See “Nodes”)
    • Use make function nodes to avoid multiple copies and modifications of nodes. (See “Nodes”)