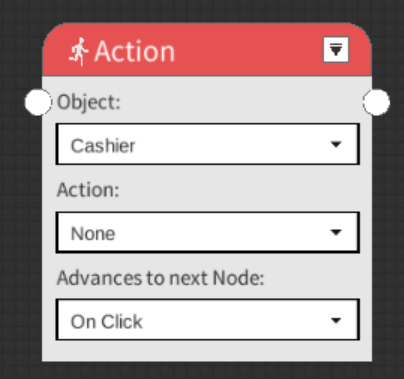
By using action nodes, you can move, flip, set visibility, rotate, resize, change the image of, or modify the parent of the object you choose from the current scene. The action node consists of following parameters:
Object: The target of the action node. The object can be selected from all objects in the current scene using the dropdown bar.
Action: The actions that are allowed for the currently selected object vary. Some objects with unique object variables (See “Object Variables”), such as texts or buttons, may have more or fewer actions available than image objects. The detailed action will be introduced in the following sections. The special actions for unique object variables are marked with star (*).
Advances to next Node: Defines how the next node will be executed after the action node is executed:
On Click: The next node will be called if players click the mouse button.
When Completed: The next node will be automatically called when the action is finished.
Instantly: The next node will be automatically called at the beginning of the action.
After Time: The next node will be automatically called after a certain amount of time that you define
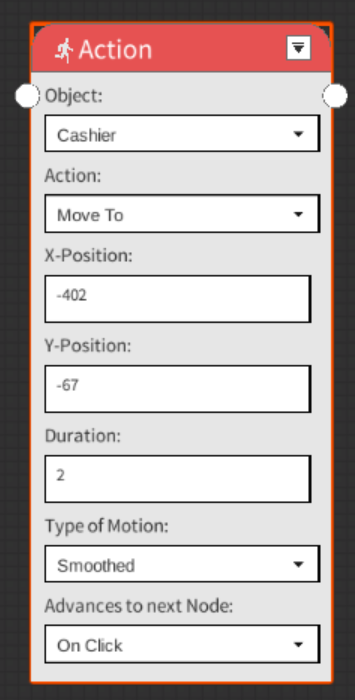
Action - Move To
Figure 2. Move To Action Node.
You can use the Move To action to move the object to a certain point on the map. The Move To action node consists of following parameters:
X-Position: The X-coordinate of the point to which you want to move the selected object. The initial value is the current X-coordinate of the object.
Y-Position: The Y-coordinate of the point to which you want to move the selected object. The initial value is the current Y-coordinate of the object.
Duration: The time of the moving process. The initial value is set to 2 seconds.
Type of Motion: The moving speed curve of the object.
Smoothed: The object will move smoothly to the point, accelerating at the start and slowing down at the end.
Linear: The object will move at a constant speed.
Speeds Up: The object will speed up when moving.
Slows Down: The object will slow down when moving.
Elastic: The object will bounce at the end point. The object will first overshoot the endpoint and eventually bounce back to it.
Bounce: The object will bounce at the end point. The object will not overshoot the endpoint.
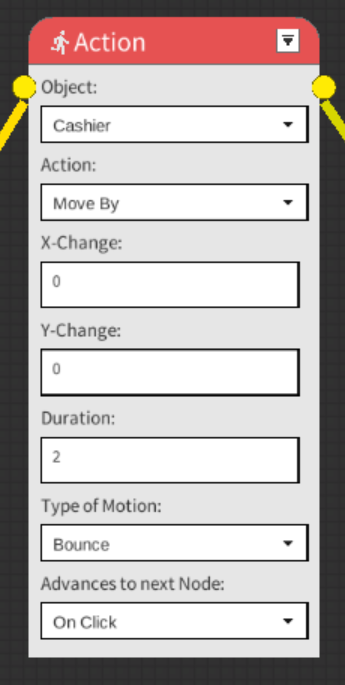
Action - Move By
Figure 3. Move By Action Node.
You can use the Move By action to move an object by defining the relative distance between the endpoint and the object’s current position. The Move By action node consists of following parameters:
X-Change: The change in the object’s X-coordinate. Setting a positive value will move the object to the right; a negative value will move it to the left.
Y-Change: The change in the object’s Y-coordinate. Setting a positive value will move the object to the top; a negative value will move it to the bottom.
Duration: The time of the moving process. The initial value is set to 2 seconds.
Type of Motion: The moving speed curve of the object.
Smoothed: The object will move smoothly to the point, accelerating at the start and slowing down at the end.
Linear: The object will move at a constant speed.
Speeds Up: The object will speed up when moving.
Slows Down: The object will slow down when moving.
Elastic: The object will bounce at the end point. The object will first overshoot the endpoint and eventually bounce back to it.
Bounce: The object will bounce at the end point. The object will not overshoot the endpoint.
Action - Flip
Figure 4. Flip Action Node.
You can flip the object horizontally or/and vertically by using the Flip action. By selecting the checkbox “Horizontally” will flip the object horizontally; By selecting the checkbox “Vertically” will flip the object vertically. You can select these 2 checkboxes together to flip the object both vertically and horizontally.
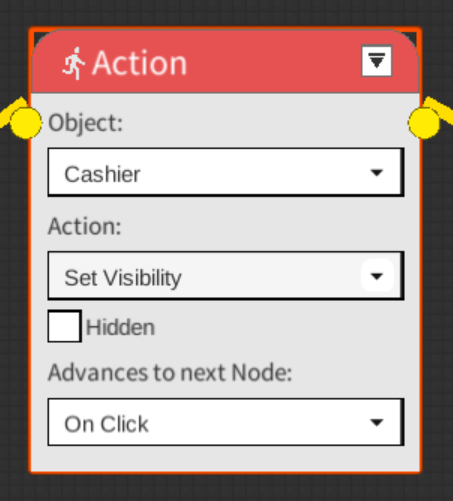
Action - Set Visibility
Figure 5. Set Visibility Action Node.
You can use Set Visibility action to set the visibility of the object. Selecting the ‘Hidden’ checkbox will make the object invisible; if the checkbox is not selected, the object will be visible.
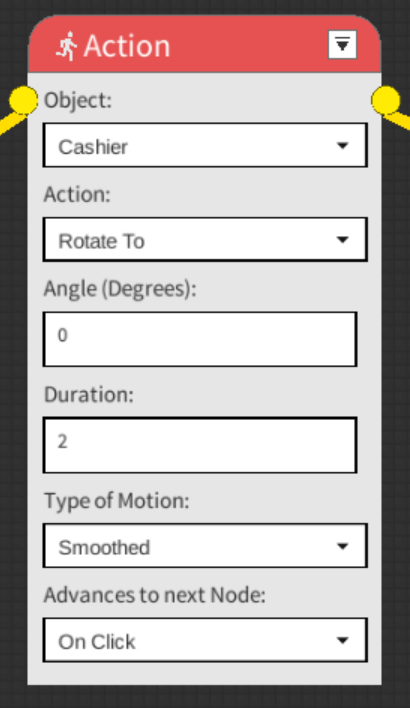
Action - Rotate To
Figure 6. Rotate To Action Node.
You can use the Rotate To action to rotate the object to a specific degree, regardless of the object’s current rotation. The Rotate To action node consists of following parameters:
Angle (Degrees): The target rotation angle in degree of the object. The initial value is the current rotation angle in degree of the object.
Duration: The time of the moving process. The initial value is set to 2 seconds.
Type of Motion: The rotating speed curve of the object.
Smoothed: The object will rotate smoothly to the end degree, accelerating at the start and slowing down at the end.
Linear: The object will rotate at a constant speed.
Speeds Up: The rotation will speed up when rotating.
Slows Down: The rotation will slow down when rotating.
Elastic: The rotation will bounce at the end degree. It will first overshoot the target degree and then bounce back to it.
Bounce: The rotation will bounce at the end degree. The rotation will not overshoot the target degree.
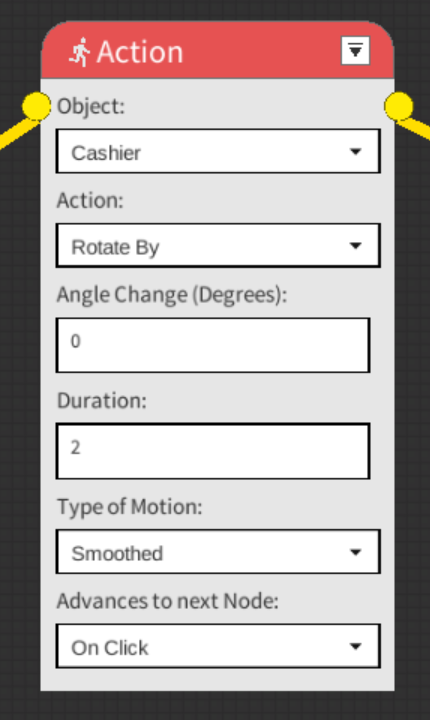
Action - Rotate By
Figure 7. Rotate By Action Node.
You can use the Rotate By action to rotate the object by adding to or subtracting from its current degree. The Rotate By action node consists of following parameters:
Angle Change (Degrees): The angle change that would be applied to the selected object. Setting a positive value will rotate the object clockwise; a negative value will rotate it counterclockwise.
Duration: The time of the moving process. The initial value is set to 2 seconds.
Type of Motion: The rotating speed curve of the object.
Smoothed: The object will rotate smoothly to the end degree, accelerating at the start and slowing down at the end.
Linear: The object will rotate at a constant speed.
Speeds Up: The rotation will speed up when rotating.
Slows Down: The rotation will slow down when rotating.
Elastic: The rotation will bounce at the end degree. It will first overshoot the target degree and then bounce back to it.
Bounce: The rotation will bounce at the end degree. The rotation will not overshoot the target degree.
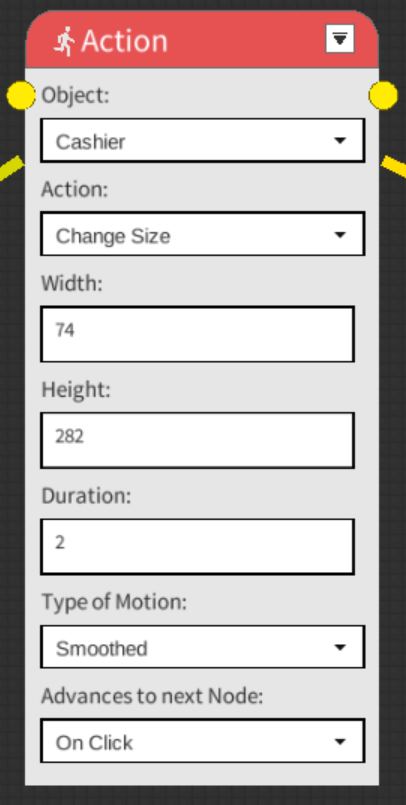
Action - Change Size
Figure 8. Change Size Action Node.
You can use the Change Size action to change the size of the object. The Change Size action node consists of following parameters:
Width: The width to which you want to add to the current size of the object.
Height: The height to which you want to add to the current the size of the object.
Duration: The time of the changing process. The initial value is set to 2 seconds.
Type of Motion: The changing speed curve of the object.
Smoothed: The object size will change smoothly to the point, accelerating at the start and slowing down at the end.
Linear: The object size will change at a constant speed.
Speeds Up: The object size change will speed up.
Slows Down: The object size change will slow down.
Elastic: The object size will bounce at the target size. The size will first overshoot the target size and eventually bounce back to it.
Bounce: The object size will bounce at the target size. The object size will not overshoot the target size.
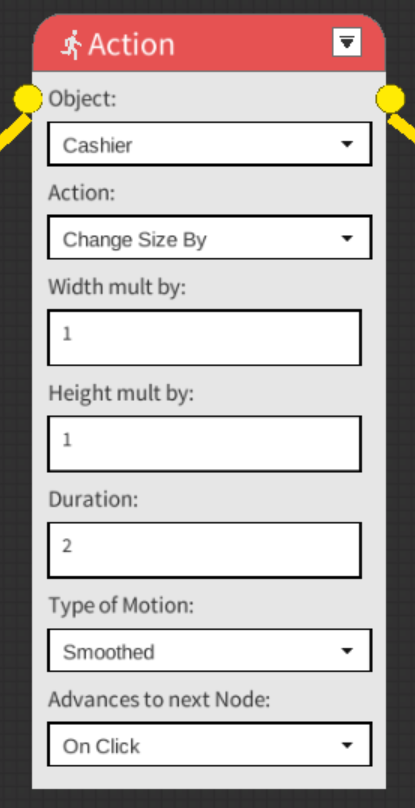
Action - Change Size By
You can use the Change Size By action to change the size of the object adding to or subtracting from its current size. The Change Size By action node consists of following parameters:
Width mult by: The width to which you want to change the size of the object. The initial value is the object’s current width. Setting a positive value will increase the width; setting a negative value will reduce the width.
Height mult by: The height to which you want to change the size of the object. The initial value is the object’s current height. Setting a positive value will increase the height; setting a negative value will reduce the height.
Duration: The time of the changing process. The initial value is set to 2 seconds.
Type of Motion: The changing speed curve of the object.
Smoothed: The object size will change smoothly to the point, accelerating at the start and slowing down at the end.
Linear: The object size will change at a constant speed.
Speeds Up: The object size change will speed up.
Slows Down: The object size change will slow down.
Elastic: The object size will bounce at the target size. The size will first overshoot the target size and eventually bounce back to it.
Bounce: The object size will bounce at the target size. The object size will not overshoot the target size.
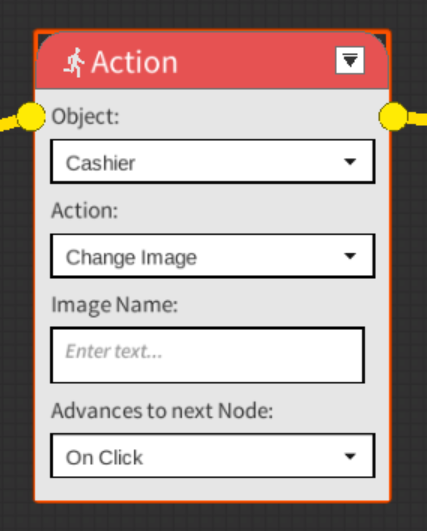
Action - Change Image*
Figure 10. Change Image Action Node
You can use the Change Image action to change the image of the object (If the object is not a Text object) by inputting the name of the image in the “Image Name” input box. To check the current available image, please check the “Object Variable – image” for assets in the Object Tabs.
Action - Move Forward or Back
Figure 11. Move Forward or Back Node.
You can change the layer order of the object by using the Move Forward or Back action. The objects in the forward layers will be displayed over the objects in the backward layers. By selecting the ‘Move to Front’ option from the Front-to-Back Order dropdown menu, you can move the object one layer forward; by selecting ‘Move to Back,’ you can move the object one layer back.
Action - Change Parent
Figure 12. Change Parent Action Node.
You can set the parent of the selected object by using the Change Parent action. After setting the parent object, the object and the parent object will be treated as one object. After action nodes (move, flip, set visibility, rotate, change size) are applied to the parent object, these action nodes will also be applied to the object in the same way. By typing the name of the parent object into the ‘Name of Parent Object’ input bar, you can attach this object to the parent object as a child. The name of the objects can be found in the Object Variable list.
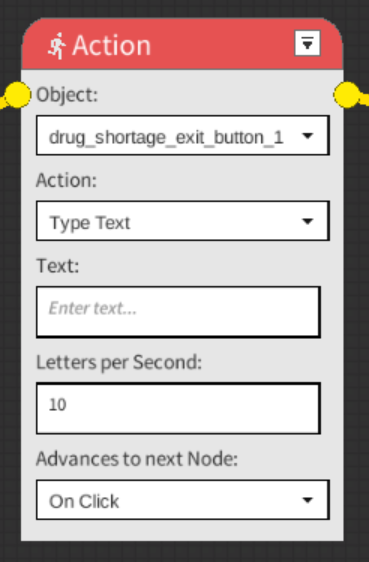
Action - Type Text*
Figure 13. Type Text Action Node.
The Type Text action can display text on objects that have the text object variable, using a typewriter-like animation. The Type Text action consists of following parameters:
Text: The text you want to display on the object.
Letters per Second: The typing speed of the animation. The initial speed is set to 10 letters per second.
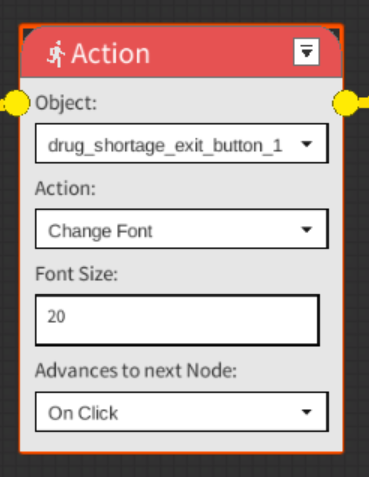
Action - Change Font*
Figure 14. Change Font Action Node.
By changing the value in the “Font Size” input bar in the Change Font action, you can change the font size of the texts on the object.
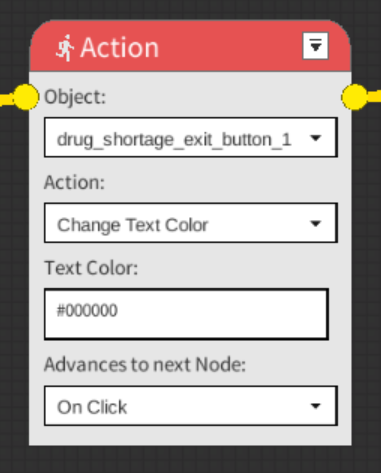
Action - Change Text Color*
Figure 15. Change Text Color Action Node.
By changing the value in the “Text Color” input bar in the Change Text Color action, you can change the color of the texts on the object. The color of the text is stored in Hex numbers, see also color picker.
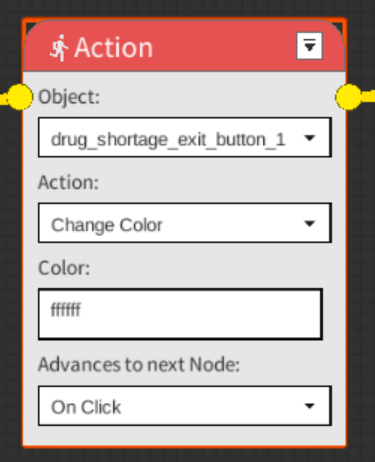
Action - Change Color*
Figure 16. Change Color Action Node.
By changing the value in the “Color” input bar in the Change Color action, you can change the color of the object (only available for Button and Slide Bar objects). The color of the text is stored in Hex numbers, see also color picker.
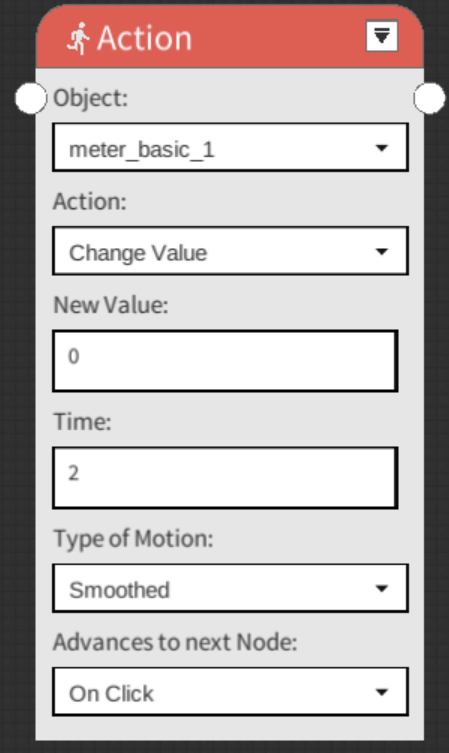
Action - Change Value*
Figure 17. Change Value Action Node.
You can use the Change Value action to change the value of the meter object, which will change the position of the progress bar. The max value of the meter object is 100, which means the progress bar fills 100% of the container. The Change Value action node consists of the following parameters:
New Value: The new value of the meter object, in between 0 to 100, indicating the new position of the progress bar.
Time: The time of the changing process. The initial value is set to 2 seconds.
Type of Motion: The changing speed curve of the progress bar.
Smoothed: The progress bar will change smoothly to the point, accelerating at the start and slowing down at the end.
Linear: The progress bar will change at a constant speed.
Speeds Up: The progress bar change will speed up.
Slows Down: The progress bar change will slow down
Elastic: The progress bar will bounce at the target point. The bar will first overshoot the target point and eventually bounce back to it.
Bounce: The progress bar will bounce at the target point. The progress bar will not overshoot the target point.